Showing posts with label baby crafts. Show all posts

Friday, December 10, 2010

The One About the Recipe Binder (Part 2)


Remember when I started on making a vintage-themed recipe binder in order to organize all the recipes I have from newspapers, magazines, and the Internet? When I first wrote about it here, I only got
this far.


I was able to find the time to get more work into it.


I bought binder dividers to categorize the recipes.


The binder dividers weren't this pretty when I bought them. They were plain and came in generic blue, red, yellow, and green. So I bought some vintage-looking gift wrappers and Mod Podge-d them onto the dividers.


Words to live by...


One gift wrapper was enough to cover only four dividers. I went out to buy more of the same print but I just couldn't resist this print! It's a 1968 Tigger!


I printed the recipes, added pictures and clipart, and placed them in clear sheet protectors.

Now I can't wait to get started on cooking! Haha! Happy crafting -- and cooking!

Wednesday, February 10, 2010

The One About What's Inside the Valentine Loot

Thankfully, LBC has safely, efficiently, and speedily delivered my package to Cebu. My good friend Darlene gladly received them and texted to inform me. This is what I made for my former nursery students:


I made them an activity book.


It is so not a coloring book. They kinda complete the whole picture by drawing on their thoughts and ideas. And yes, they can color afterwards.

I had them ringbound (in red, of course).
I got these tags from Living Locurto .
Now, for my teacher friends, I got inspired by Skip to My Lou. She loves giving gifts to her kids' teachers.

I printed the one-liners on colored paper.
Then I cut them up in strips and stuck them on the goods using double-sided tape. I then sealed each strip with a sticker. I have a bunch of reward stickers at work which I use on my students.
Here are the rest:


Butong pakwan!


I then arranged everything in a plastic food tub.
And then printed labels for the cover.

As of this writing, I have been receiving text messages and emails from my teacher friends, thanking me for their gifts. I am soooo glad they love it as much as I am glad from making it for them.
Happy crafting!


Monday, January 11, 2010

The One about the Diaper Cake Tutorial

My first attempt at making diaper cakes last December. Although I was inspired by Homemade by Jill I've decided to make a tutorial for my one-tiered diaper cakes. It's really very simple and more importantly, fun to do!

Cut a big circle from a piece of sturdy cardboard or tagboard. Mine was approximately 12"-14" in diameter. This will be the base of the cake.

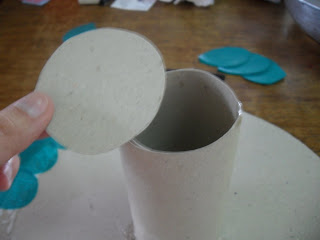
Next, cut a rectangle from the same sturdy cardboard or tagboard and roll it into a cylinder. The open ends have diameters of about 2".

Cut a 2" in diameter circle from the tagboard and glue it on one end of the cylinder.
Using hot glue, place the cylinder in the middle of the round tagboard. I then cut out leaves from green tissue paper and pasted them around the around the tagboard.

Next, roll the diapers one by one and secure them with white elastic bands (or clear ones) to prevent them from opening up.

Diapers all rolled up. (Sorry for the mess in the background…that's how crafting is…)


Place the diapers around the cylinder and secure with a thick elastic band. For this one-tiered cake, I used 18 diapers.


Make crepe paper roses. I made about four. Just cut a small portion from the crepe paper. Roll and twirl around to make roses.


Place the roses on the top of the cylinder (make sure to hide the cardboard) using hot glue. Use a pretty ribbon to cover the elastic band that holds all the diapers together.
Happy crafting!