
Showing posts with label gifts for babies. Show all posts
Showing posts with label gifts for babies. Show all posts
Tuesday, April 6, 2010
The One About Made by You Monday
Notice the updated sidebar? I participated in Skip to My Lou's Made by You Monday! Look for craft project number 178! :)

Friday, March 19, 2010
The One About Baby RG
I like making baby crafts. My Cebu-based friend (a former colleague at Cebu International School), Gade, will be giving birth soon to a baby girl. She e-mailed me recently to invite me to attend her baby shower but I couldn't go since I was in Manila. I wanted to give her a gift anyway, so I came up with this simple baby shower gift.
I wanted to do an alphabet silhouette frame at first. I love the drama that silhouettes evoke and I thought maybe I could make one for a baby - a fresh change from all the cutesy baby shower gifts. Eventually, I decided it would be nicer to concentrate on the baby's initials with silhouettes of pictures that begin with the initials of the baby's name.
I texted her to ask for her baby's name but, according to her, it was still a secret. I asked for the initials, instead, and they turned out to be "RG" -- Teddy Bird's real name initials! :)
I printed the initials from a computer then traced and cut them out from white construction paper.

I got cliparts of a rabbit (R is for rabbit) and a girl (G is for girl) and found a way to make a picture story out of them. I traced and cut them out from construction paper too.


I arranged the cutouts on a pink construction paper as the background and glued them into place. The frame I used was given to me by Cebu International School when they used it to store my "Certificate of Appreciation" of service before I left. I've been wanting to find another use for it.

Tadaaaaaa!
I have friends from Cebu coming over to Manila next week. We will be attending the EARCOS Teachers Conference 2010 at the International School Manila. A number of international schools in Asia will be attending too. I'll just ask my Cebu International School friends to handcarry this gift for me when they fly back to the Queen City of the South (which I happen to miss terribly).
Speaking of EARCOS, I just thought of the perfect EARCOS lootbags to give to my friends! More on that soon!
Happy crafting!
Monday, January 11, 2010
The One about the Diaper Cake Tutorial
My first attempt at making diaper cakes last December. Although I was inspired by Homemade by Jill I've decided to make a tutorial for my one-tiered diaper cakes. It's really very simple and more importantly, fun to do!



Next, roll the diapers one by one and secure them with white elastic bands (or clear ones) to prevent them from opening up.
Diapers all rolled up. (Sorry for the mess in the background…that's how crafting is…)

Place the diapers around the cylinder and secure with a thick elastic band. For this one-tiered cake, I used 18 diapers.

Make crepe paper roses. I made about four. Just cut a small portion from the crepe paper. Roll and twirl around to make roses.

Place the roses on the top of the cylinder (make sure to hide the cardboard) using hot glue. Use a pretty ribbon to cover the elastic band that holds all the diapers together.

Cut a big circle from a piece of sturdy cardboard or tagboard. Mine was approximately 12"-14" in diameter. This will be the base of the cake.

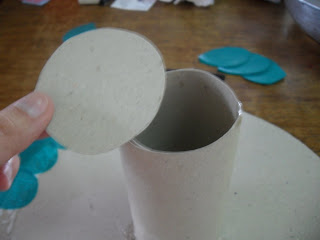
Next, cut a rectangle from the same sturdy cardboard or tagboard and roll it into a cylinder. The open ends have diameters of about 2".


Cut a 2" in diameter circle from the tagboard and glue it on one end of the cylinder.

Using hot glue, place the cylinder in the middle of the round tagboard. I then cut out leaves from green tissue paper and pasted them around the around the tagboard.


Next, roll the diapers one by one and secure them with white elastic bands (or clear ones) to prevent them from opening up.

Diapers all rolled up. (Sorry for the mess in the background…that's how crafting is…)

Place the diapers around the cylinder and secure with a thick elastic band. For this one-tiered cake, I used 18 diapers.

Make crepe paper roses. I made about four. Just cut a small portion from the crepe paper. Roll and twirl around to make roses.

Place the roses on the top of the cylinder (make sure to hide the cardboard) using hot glue. Use a pretty ribbon to cover the elastic band that holds all the diapers together.
Happy crafting!
Subscribe to:
Posts (Atom)